Latest Update: MaxCDN 50% Coupon Code is now available. Get a flat 50% discount from your yearly package purchase it for your website.
Every Internet user loves faster page loads and no one can deny that fact. It is the responsibility of Web Master to optimize the website and make it serve the contents to the users faster. MaxCDN and WordPress are two best friends, technically. WordPress is one light weight blogging software and MaxCDN addition can boost the Google Pagespeed score to 5 points or above than it was before. Blog or a website that regularly gets image updates and has more static contents, should consider adding CDN service to optimize and load them faster from SSD (Solid State Drive) and more Memory powered servers.
MaxCDN does just that, by serving your website static contents from high speed servers across the world. WordPress by default is a powerful blogging system. Faster page load and good page speed score can give a boost to your website in terms of SEO. Google Webmaster Guide tells that faster page load ensures the visitor satisfaction by making them to not wait for more seconds or minutes when they are hungry for your contents. Sometime ago we wrote about “What is the Best CDN for WordPress ?” and featured MaxCDN.
You have a quality food for their thoughts and why not considering to serve them faster which can make them to bookmark and visit your website again and again ?
We will see how to Setup and Install MaxCDN on WordPress Blog using W3 Total Cache Plugin and WP Super Cache Plugin. In this simple tutorial you will see how to install and setup maxcdn on your wordpress blog to give your pagespeed score a big boost.
Have you bought MaxCDN account to follow this tutorial ? If your answer is NO, then here we have a wonderful deal waiting for you to save a flat 25% OFF on your purchase of Starter or Business plan with MaxCDN. You can use our exclusive MaxCDN Coupon Code “DAILYTUT” to avail 25% discount to super charge your website pagespeed.
Setup MaxCDN for WordPress
Well the setup of MaxCDN for WordPress was bit complex earlier, but not anymore. When you go through setup MaxCDN W3 Total Cache settings, its a breeze to install and configure CDN in your blog. Lets see how to setup MaxCDN using W3 Total Cache wordpress plugin.
MaxCDN W3Total Cache Setup
W3 Total Cache is one popular wordpress cache plugin available. It is a widely used wordpress cache plugin system and it has some extra features than just doing the cache task. It has more optimization options that lets you tweak and tune your blog to make it load faster and better. Descriptions on each option they have makes it easy for anyone to understand and configure the WordPress cache system. W3 Total Cache is my favorite plugin and it cuts the use of other plugins and acts like an all in one plugin for Cache and Page Speed optimization.
Step 1: Login to WordPress wp-admin area and navigate to W3 Total Cache General Settings.
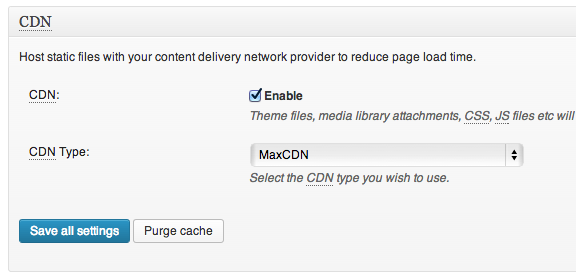
Step 2: Scroll down to “CDN” section then Select “Enable” and choose CDN Type from the list box as “MaxCDN“. Click on “Save all Settings”.
Step 3: Navigate to “CDN” under W3 Total Cache menu in the left wordpress tabs menu. You will also get “Authorization Key missing” error at the top of W3 Total Cache page after you clicked on Save Settings in previous step.

Before authorizing the CDN service we must setup a CNAME record to fetch static files from MaxCDN Servers. Here i am going to use cPanel to demonstrate how to setup CNAME record for MaxCDN. If you have any other control panels, then kindly refer the help guide or create a support ticket in your hosting to let the technical support team of your hosting company create it for you.
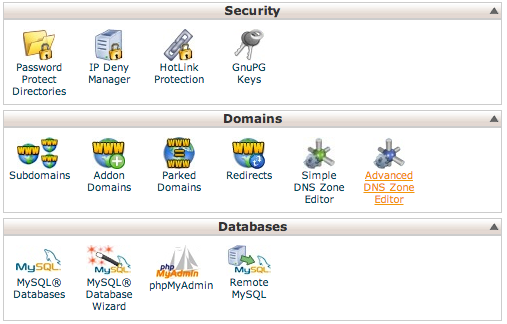
Step 4: Login to your website control panel (cPanel) and navigate to “Advanced DNS Zone Editor” under “Domains” section.
Step 5: Under “Add a Record” section add the details of your CDN to create a CNAME record in your server. “Name” field is the name of the CDN you prefer example: cdn.dailytut.com. Just type the cdn name and you will notice the domain name added to it automatically with a period. “TTL” value can be “14400” by default. Select Type as “CNAME“.
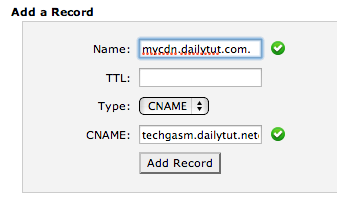
Step 6: Now in the CNAME field you have to enter the “Temporary URL” that you can get by Logging into MaxCDN Control Panel and navigating to “Zones -> View Pull Zones -> Manage“. Click on “Add Record” in cPanel once you have filled all the necessary details.
Example Temporary URL: name.name.netdna-cdn.com
Once you have completed adding the CNAME Record, it will take few hours or sometimes minutes to see it come alive. If your CNAME is CDN then the url will look like cdn.yourdomainname.com. So try to ping the domain name to know the status.
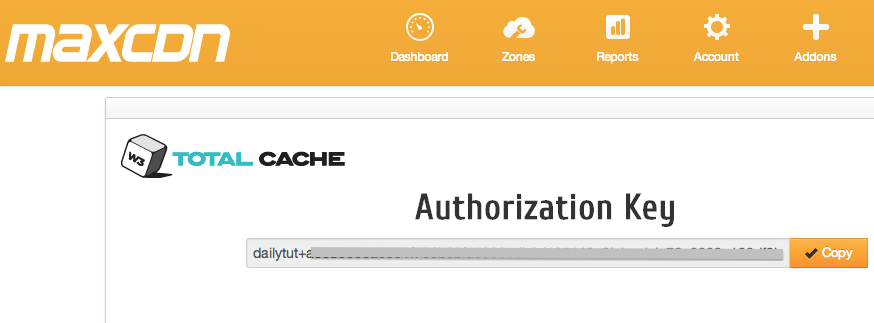
Step 7: Now go back to CDN Configuration page in your blog, you will see a button “Authorize” which will help you to complete the CDN setup for your blog. Goahead and click on the authorize button.

Step 8: Copy the “Authorization Key” opened in the new window or tab, then paste it in the Authorization Key field in CDN Configuration section.
Step 9: If you use SSL for your CDN then select “SSL Support” accordingly else leave it to “Auto Determine Connection”.
Step 10: In the next field “Replace sites hostname with” enter your CNAME record that you have created in Step 6. Click on “Test MaxCDN” button to see everything works fine. It will show “Test Passed” message. If you get any error related to CNAME, then you may need to wait for a while to let the CNAME Creation and propagation done.
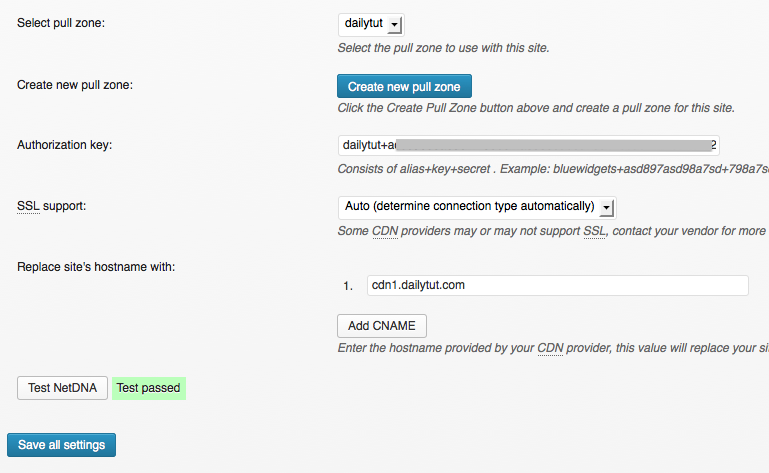
That is all. Now click on “Save all Settings” and you are done configuring the MaxCDN on WordPress blog successfully. Right click on any image in your blog post and check the image link status to see that the images are loading from CDN or still from your server. If you have any trouble following the steps i wrote, please leave a comment below. I will be happy to answer you queries if you stuck up in any step.
MaxCDN WP Super Cache Setup
Setup MaxCDN using WP Super Cache plugin and start serving all your static files and images from super fast CDN servers to your readers in minutes. WP Super Cache is another popular cache plugin used by bloggers. So if you are looking for a simple guide to setup CDN using your WP Super Cache plugin then here it is.
Create CNAME record using cPanel of your Hosting as instructed in the Step 6 above.
Step 1: After creating CNAME Record, navigate to WP Super Cache under “Settings” in your WordPress Admin Dashboard.
Step 2: Click on “CDN” Tab and Enable CDN Support.
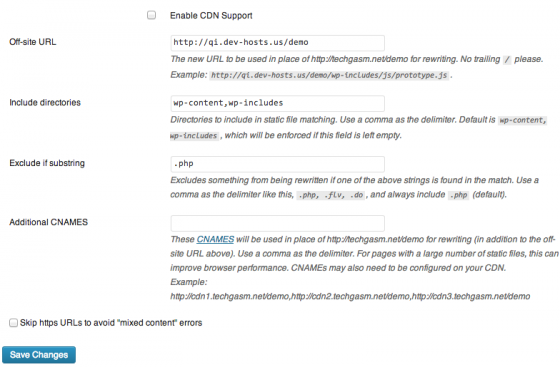
Step 3: Fill out the fields to make your CDN work for your blog.
Off-site URL: http://cdn.yourdomainname.com
Include Directors: the directories that has static files which you wanted to served by CDN servers. By default it includes Wp-Content directory which has themes, plugin files and media contents in it. You may specify any other directory that you want to include which are created by you.
Exclude if Substring: you can specify which file format should be excluded from being served by CDN servers. If you have any dynamic contents or for other reasons you dont want some file types to be ignored, specify them here to be excluded.
Additional CNAMES: Just like W3 Total Cache, WP Super Cache also allows the addition of multiple CDN servers to be added. So add them if you have any. Finally, SSL option provided by CDN service.
Also the MaxCDN technical support team is very quick in answering user queries. So write to [email protected] anytime to get problems related to CDN control panel fixed. When i setup my CDN i had trouble viewing the zones created newly. They fixed it in less than 10 minutes answering my email. They are the best without any doubt when it comes to solving the support tickets.
Thanks for reading and you may now share this post with Facebook, Twitter and Google Plus to let your friends and followers follow this simple guide to setup maxcdn on wordpress blog. Have a wonderful and productive day.